Installation
Install on your linux computer or linux / unix server
Requirements: The installation must be carried out on a (virtual) machine with a recent Linux OS that support Docker (see Infrastructure)
Retrieving the code
Go to the destination directory of your choice then clone the repository and cd to your clone path:
git clone https://github.com/inrae/pgd-mmdt.git pgd-mmdt
cd pgd-mmdt
Installation of Docker containers
MAGGOT uses 3 Docker images for 3 distinct services:
- pgd-mmdt-db which hosts the MongoDB database
- pgd-mmdt-scan which scans the data and updates the contents of the database and the web interface
- pgd-mmdt-web which hosts the web server and the web interface pages
Configuration
- run : defines root of the data directory (including for development)
- docker/db/initialisation/setupdb-js.template : defines MongoDB settings
- docker/scan/scripts/config.py : defines MongoDB settings (dbserver, dbport, username, password)
- web/inc/config/mongodb.inc : defines MongoDB settings (dbserver, dbport, username, password)
- web/inc/config/config.inc : defines many of web parameters (modify only if necessary)
- web/inc/config/local.inc : defines the application parameters specific to the local installation (not erased when updating).
Warning : You have to pay attention to put the same MongoDB settings in all the above configuration files. It is best not to change anything. It would have been preferable to put a single configuration file but this was not yet done given the different languages involved (bash, javascript, python, PHP). To be done!
Warning : If you are using VirtualBox with Windows then you must make sure to Enable AVX
Note : If you want to run multiple instances, you will need to change in the run file, i) the container names, ii) the data path, iii) the MongoDB volume name and iv) the MongoDB port
The following two JSON files are defined by default but can be easily configured from the web interface. See the Terminology Configuration section.
- web/conf/config_terms.json : define the terminology
- web/conf/maggot-schema.json : define the JSON schema used to validate metadata files.
Commands
The run shell script allows you to perform multiple actions by specifying an option :
cd pgd-mmdt
sh ./run <option>
Options:
- build : Creates the 3 Docker images namely pgd-mmdt-db, pgd-mmdt-scan and pgd-mmdt-web
- pull : Retrieves (pull) from DockerHub the 3 Docker images namely pgd-mmdt-db, pgd-mmdt-scan and pgd-mmdt-web
- start : 1) Starts the 3 services by creating the Docker containers corresponding to the Docker images; 2) Creates also the MongoDB volume.
- stop : 1) Removes all the 3 Docker containers; 2) Remove the MongoDB volume.
- initdb : Creates and initializes the Mongo collection then loads the metadata sets (JSON file) into the database
- scan : Scans the directory tree for metadata files and compiles them into a JSON file.
- fullstart : Executes the start and initdb actions.
- restart : Executes the stop and fullstart actions.
- ps : Checks that all containers are running correctly
- statdb : Retrieves information about the Mongo database in JSON format (Application must be started in full mode)
- showdb : Retrieves the content of the Mongo database in JSON format (Application must be started in full mode)
- passwd <user>: Defines the admin password if no user is specified, allowing you to add entries in dictionaries or to add/update the terminology files (definition & documentation, see configuration). If a user is specified, the dictionary consultation will be authorized for this user.
Home page customization
- Since the version 2.3, it is now more easy to customize the home page, depending on your site. See Home page customization
Starting the application
-
You must first either build the 3 docker container images ... (using MongoDB 6.0+ with AVX enabled)
sh ./run build -
... or pull the 3 images from DockerHub
sh ./run pull -
The application can be sequentially started :
- Starting the web interface
sh ./run start - Scanning the data directory to search for metadata files (META_XXXX.json) in case this is the first time the application is being run.
sh ./run scan - Initialization of the MongoDB database
sh ./run initdb
- Starting the web interface
-
You can also launch the 2 steps (start and initdb) with a single command:
sh ./run fullstart - You can check if all metadata sets have been loaded using the showdb action:
sh ./run showdb | grep ' title' - To update the MongoDB database in case you have uploaded a new or updated metadata file, you must perform a scan then restart the system once it is complete. This allows for a background scan without preventing the application from functioning.
sh ./run scan sh ./run restart - WARNING: Modifying the terminology file will also affect MongoDB. Therefore, you must first stop and then restart the application without initializing the database, perform a scan, and then restart the application in full mode.
sh ./run stop
sh ./run start
sh ./run scan
sh ./run restart
Launching the web application in the web browser
-
Once the application is started, we can see if the containers are started using the following command:
docker ps -a -
which should produce a result similar to the following:
   CONTAINER ID  IMAGE          COMMAND                 CREATED          STATUS         PORTS                                  NAMES
   5914504f456d  pgd-mmdt-web   "docker-php-entrypoi."  12 seconds ago   Up 10 seconds  0.0.0.0:8087->80/tcp, :::8087->80/tcp  mmdt-web
   226b13ed9467  pgd-mmdt-scan  "cron -f"               12 seconds ago   Up 11 seconds                                         mmdt-scan
   81fecbb56d23  pgd-mmdt-db    "docker-entrypoint.s."  13 seconds ago   Up 12 seconds  27017/tcp                              mmdt-db
-
On the first line, the one which corresponds to the web interface, we see that port 80 of the docker is exported to port 8087 of the VM. Let's say that the IP address of your VM is 192.168.56.2, then in your browser you will need to put the URL http://192.168.56.2:8087/. You can of course change the port number in the 'run' file.
-
Finally, we recommend using a lightweight http server like nginx so that the Maggot URL will be http://192.168.56.2/maggot/. Below an example of config:
## /etc/nginx/nginx.conf
http {

...
    upstream maggot  { server 127.0.0.1:8087; }
...

}

## /etc/nginx/conf.d/my-site.conf

server {
    listen 80 default;
    server_name $host;

...

    location ~ ^/maggot/api/([^/]+)/([^/]+)$ {
        rewrite ^/maggot/api/([^/]+)/([^/]+)$ /maggot/metadata/$1?format=$2;
    }

    location ~ ^/maggot/api/([^/]+)$ {
        rewrite ^/maggot/api/([^/]+)$ /maggot/metadata/$1?format=maggot;
    }

    location ~ ^/maggot/graph/([^/]+)$ {
         rewrite ^/maggot/graph/([^/]+)$ /maggot/metadata/$1?format=graph;
    }

    location /maggot/ {
        proxy_set_header Host $host;
        proxy_set_header X-App-Name 'maggot';
        proxy_set_header X-Real-Ip $remote_addr;
        proxy_set_header X-Forwarded-Host $host;
        proxy_set_header X-Forwarded-For $proxy_add_x_forwarded_for;
        proxy_pass http://maggot/;
    }

...

}
Stoping the application
- To stop the application :
sh ./run stop
Updating the application
When updating the application, it is imperative to preserve a whole set of configuration files as well as the content of certain directories (dictionaries, javascripts dedicated to vocabularies, etc.). An update script is available (./etc/update-maggot.sh) preferably placed under '/usr/local/bin'. To preserve your configuration, it is recommended to create local configuration files.
-
A first file 'local.conf' will contain all the parameters to be preserved, initially contained in the 'run' file. A small example could be as follow :
#!/bin/bash # Hostname of the Website HOST=pmb-bordeaux.fr # Local HTTP Port for web application WEB_PORT=8088 # Path to the data DATADIR=/media/Workdir/Share/DATA/ -
A second file './web/inc/config/local.inc' will contain all the parameters to be preserved, initially contained in the './web/inc/config/config.inc' file. A small example could be as follow :
<?php

# Main title
$TITLE ='Metadata management - My Labs';
$MAINTITLE =$TITLE;

# File Browser
$FILEBROWSER=1;
$URL_FILEBROWSER='/fb/';

# Enable some functionalities
$export_oai = 1;

?>
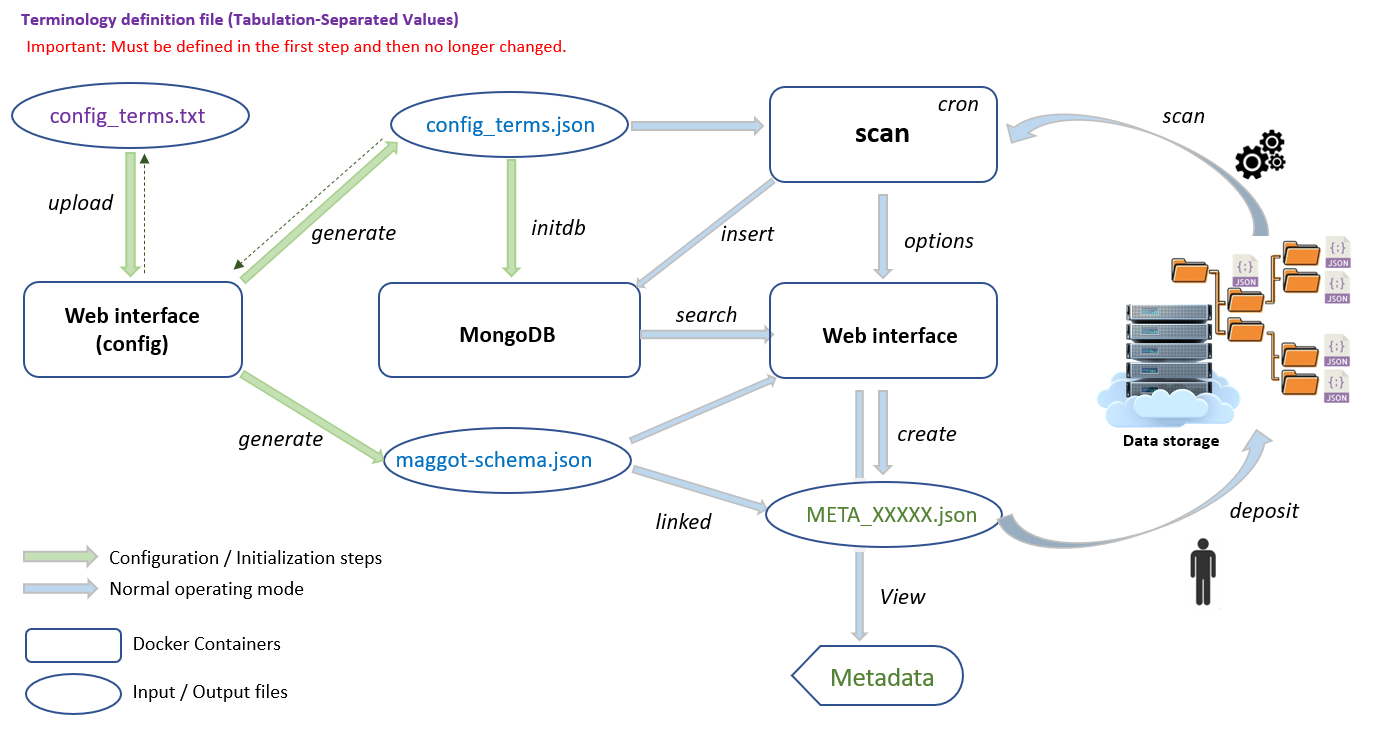
Architecture diagram
The architecture diagram shows the modules and their interactions (MongoDB, Web Interface, Metadata File Search), each embedded in a Docker container.
See how to do proceed for configuration steps.
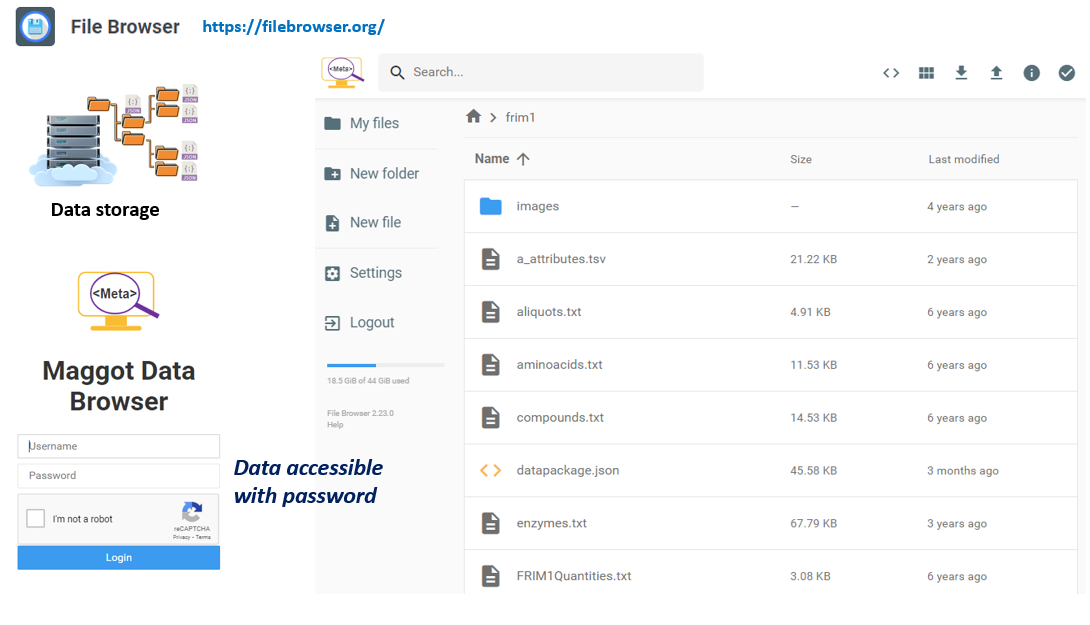
File Browser
You can provide access to your data via a file browser. This application must be installed separately but can be connected to Maggot by specifying the corresponding URL in the configuration file. Users and their rights are managed in the filebrowser application. Likewise, we can also create links to the data without a password. These links can be usefully specified as external resources in the metadata managed by Maggot.
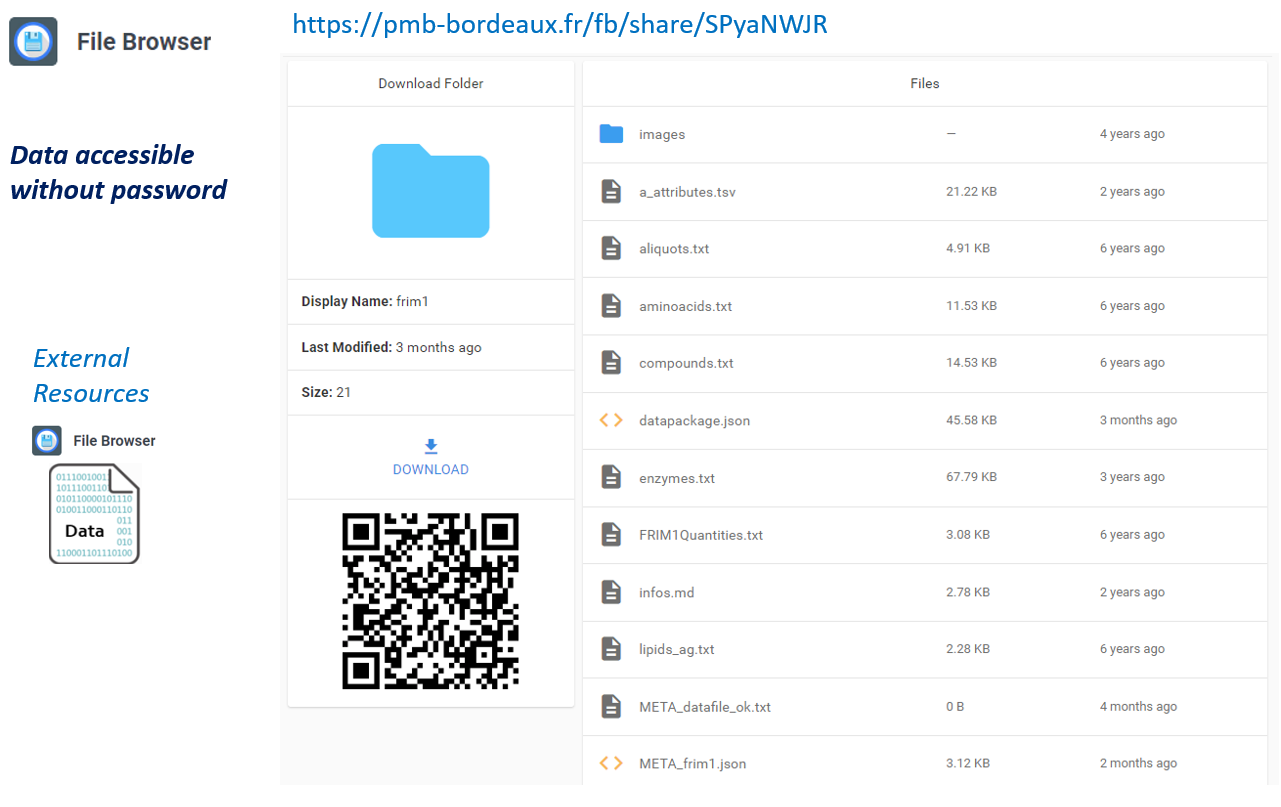
See how to do install in github
Authentication
Purpose: Implement an authentication layer based on OAUTH 2.0
The initial choice was not to manage users in the Maggot tool. This choice was made to promote the complete opening by default of metadata within a collective. However, for management within a collective that goes beyond a simple intranet, it is necessary to set up an authentication layer. Setting up such a layer can be done independently of the Maggot tool, i.e. without modifying its code or configuration. An SSO implementation is proposed online, which can serve as a basis for a larger configuration. A Wiki page provides a detailed description.
- Source code on github : https://github.com/djacob65/maggot-sso/
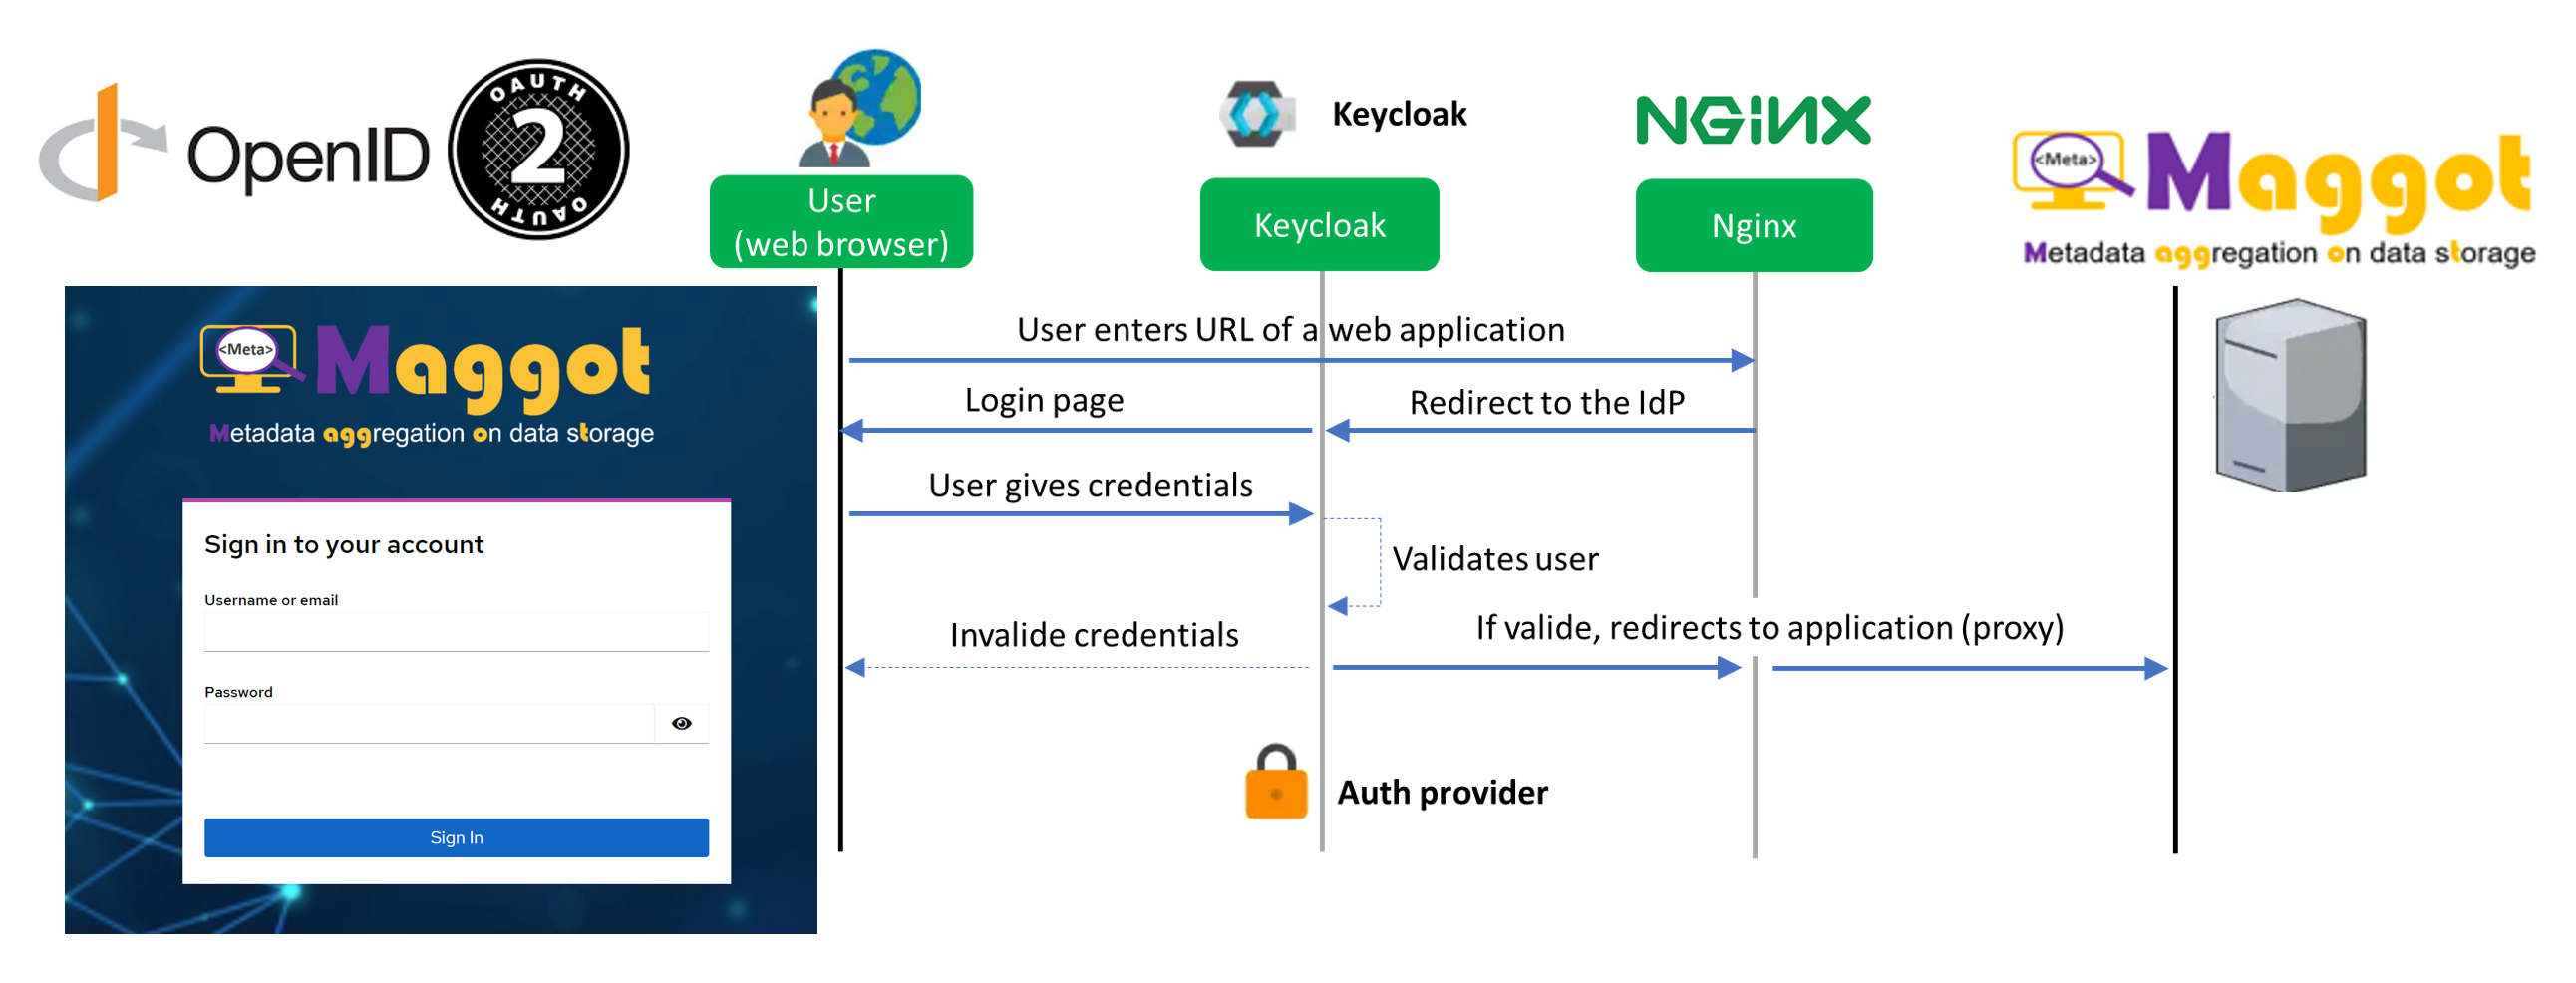
Keycloak supports OIDC (an extension to OAuth 2.0) and works as an IdP while authenticating a client